1. Introduction
The Manual Edit feature in EventCAT allows operators to review and modify transcripts and translations during live sessions or after a session has ended.
This feature helps improve translation accuracy by enabling real-time correction of typos, unclear sentences, or terminology inconsistencies generated by AI.
This guide explains how to use Manual Edit to make accurate transcript and translation corrections and ensure that the updated content is properly reflected in live displays and downloadable scripts.
2. When to Use This Feature
Manual Edit is useful in the following situations:
When a typo or incorrect translation appears on screen during a live event and needs to be fixed immediately.
When reviewing the script after a session, before downloading it, to enhance readability and accuracy.
When having live interactive sessions where some translations may need to be adjusted for clarity in real-time.
This feature benefits all EventCAT users involved in event operations, including event hosts, presentation assistants, and technical operators.
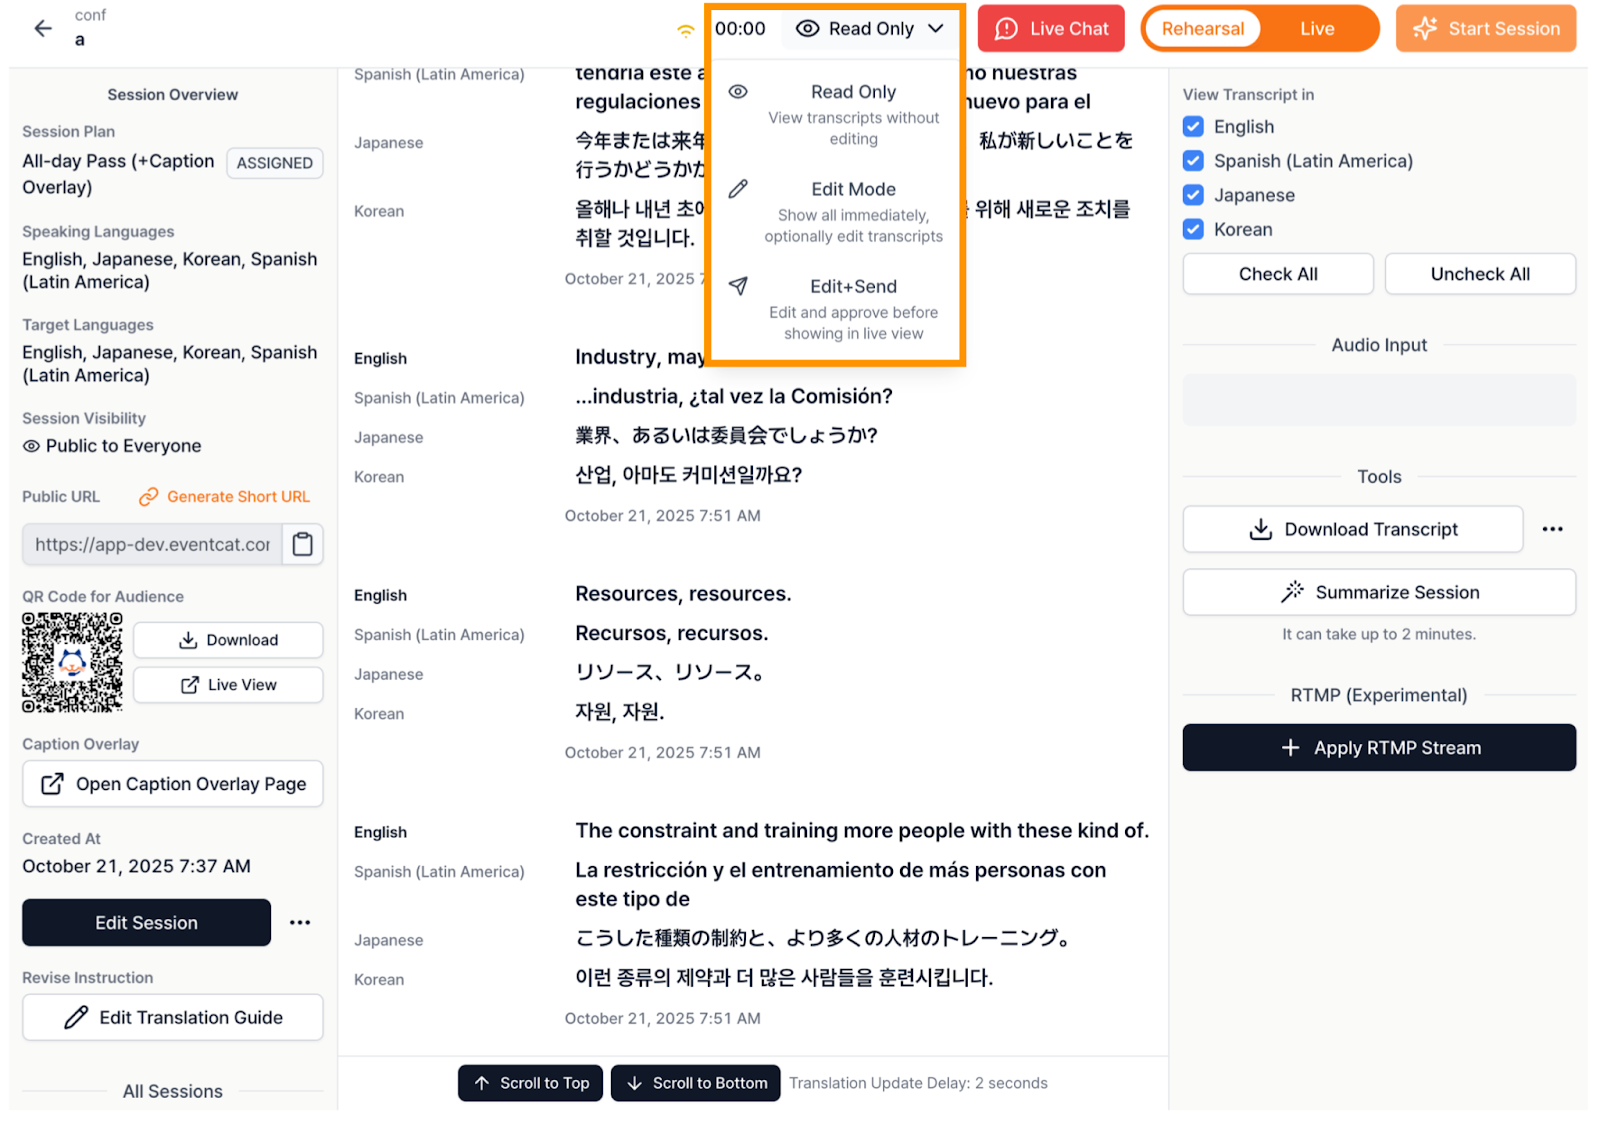
3. View Modes
Manual Edit provides three viewing modes that determine how transcripts are displayed and managed.
Each mode has a different level of editing and approval control, allowing operators to select the most suitable mode for the event.
3.1 Read-Only Mode
Purpose: To view transcripts without making any edits.
By default, EventCAT Conference starts in Read-Only Mode. You can switch to another mode using the View Mode selector at the top of the page.
Key Features:
Displays all transcripts in real time.
No edit buttons are visible.
Transcripts update automatically according to the broadcast latency.
Recommended Use: Ideal for presenters or operators who only need to monitor real-time translations.

3.2 Edit Mode
Purpose: To view and selectively edit transcripts.
This mode is ideal for reviewing and correcting transcripts after a session ends, allowing edits without affecting the live view.
Key Features:
Displays all transcripts regardless of approval status.
A pencil icon appears when you hover over a transcript.
Each transcript can be edited per language.
Edits are immediately reflected across all participants’ screens.
Save Options:
How to Edit:
Hover over the transcript and click the pencil icon.
Modify the text in the input field.
Press Enter or Cmd/Ctrl+Enter to save.
Press Esc to cancel any changes.
Advanced Editing:
Cmd/Ctrl + Click: Edit the entire sentence.
Cmd/Ctrl + Click + Drag: Edit selected text only (the system automatically expands to word boundaries).
Save & Update All Languages:
Use this when changes in one language affect others.
The AI automatically re-generates corresponding translations based on the new content.
Modified segments are marked with a timestamp and labeled as “Edited.”
Recommended Use:
When refining scripts after a session.
When editing key terms or proper nouns to ensure multilingual consistency.


3.3 Edit + Send Mode
Purpose: For reviewing, approving, and broadcasting subtitles to the audience.
This mode helps ensure subtitle quality during live events by allowing operators to control when transcripts appear on audience screens.
Key Features:
Newly generated transcripts are hidden until approved.
An “Approve All Above” button appears below each transcript.
Clicking this button sends all transcripts generated since the last approval to the audience.
Editing tools function the same as in Edit Mode.
Approval Workflow:
Review newly generated transcripts.
Make necessary edits using the edit button.
Click “Approve All Above.”
Approved transcripts are instantly sent to the live audience view.
Recommended Use:
Best for live multilingual events or official sessions that require quality control before display.

4. Switching View Modes
Locate the View Mode Selector on the top navigation bar.
Click the currently active mode (Read-Only / Edit / Edit + Send).
Select the desired mode from the dropdown menu.
The interface updates automatically to reflect the selected mode.
5. Transcript Editing
5.1 Basic Editing Workflow
Select Edit Mode or Edit + Send Mode from the View Mode Selector.
Hover over the transcript and click the pencil icon.
Edit the text as needed in the input field.
Use the shortcuts below to save or cancel changes.
When to Use Save & Update All Languages:
When an error exists across multiple languages.
When terminology or names require consistent updates.
When correcting factual inaccuracies that affect context.
5.2 Partial Text Editing
Hold Cmd/Ctrl and drag to select the text to edit.
The selected area automatically expands to full words.
Only the highlighted portion becomes editable.
Once saved, only that section is updated.
Recommended Use:
Fixing single-word or short-phrase errors.
Correcting numbers, names, or specific terms without rewriting entire sentences.
6. Display of Edited Transcripts
Edited transcripts are visually distinguishable, helping operators track modifications easily.
Color: Edited text appears in blue.
Edit History: The system records the original text, edited version, time of edit, and language.
AI Update Indicator: When “Save & Update All Languages” is used, a timestamp appears next to updated translations.
7. Best Practices
During Live Sessions
Use Edit + Send Mode for controlled broadcast quality.
Approve multiple transcripts at once using “Approve All Above.”
Test the workflow in rehearsal mode before the event.
Assign a dedicated quality checker for important sessions.
After Sessions
Use Edit Mode to finalize the entire transcript.
Correct factual errors and proper names first.
Use Save & Update All Languages for consistency across all translations.
Review overall context to ensure readability.
General Tips
Avoid excessive rewriting; keep edits concise.
Establish editing standards for team-wide consistency.
Track edit frequency and error types to improve future sessions.
8. Shortcut Summary
9. Troubleshooting
10. Additional Support
For further assistance or to report issues regarding the Manual Edit feature, please contact:
Email: contact@eventcat.com
Support Page: https://support.eventcat.com/en/support/home
Last Updated: October 30, 2025
Applies to: EventCAT Conference
Was this article helpful?
That’s Great!
Thank you for your feedback
Sorry! We couldn't be helpful
Thank you for your feedback
Feedback sent
We appreciate your effort and will try to fix the article